 跳到内容
跳到内容 Key Takeaways
- Whether you’re using rails, clamps, roof attachments or grounding parts, knowing your solar mounting system is key for secure and effective installations.
- Selecting the appropriate mounting bracket and material can increase the longevity of solar panels and preserve system efficiency in harsh weather.
- Correctly pairing mounts with the particular roofing type — pitched, flat or ground-mounted — guarantees a secure installation and long-term roof integrity.
- Material, like aluminum, galvanized steel or stainless steel, affects durability, cost and corrosion resistance.
- By considering lifecycle costs and installation and future maintenance perspectives, you can maximize your total investment in solar mounting.
- Respecting manufacturer guidelines, following safety protocols and regularly inspecting is the way to go for reliable, long-lasting solar installations.
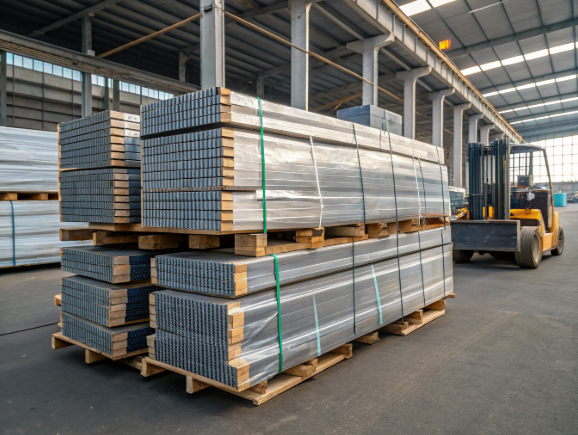

A solar mounting bracket fixes solar panels onto roofs or ground frames. For these brackets, they utilized strong steel, such as Q235 or Q345, which are hot-dip zinc coated to guard against rust. Most brackets accommodate both mono and poly panels. Factories produce them with components already assembled, making on-site work quick. Wind speeds up to 60 m/s, snow loads of approximately 1.4 kN/m² are standard test points. A lot of worldwide purchasers demand CE or SGS certificates. Bulk packaging aids with secure container shipping. Big orders often require OEM options or customized for local needs. To project spec, clear product data and CAD file support simplify planning for engineers and buyers.
The Anatomy of a Solar Structure
Solar mounting brackets are the foundation of any PV system, securing panels in position and protecting them from the elements. All components from rails, to clamps, each have a function. Key elements of a solar mounting structure include:
- Mounting Rails – Serve as the primary skeleton to hold and position panels.
- Roof Attachments – latches the structure down to various roof types.
- Module Clamps – Secure panels firmly & stable to the rails.
- Grounding Components – Connect all metal parts for electrical safety.
- Support Structures – C channel steel beams or ground posts, providing strength for decades.
- Fasteners and Hardware – Bolts, nuts and washers keep everything locked in place.
Mounting Rails
Mounting rails provide the solar array with form and fortitude. Be it hot-dip galvanized Q235 steel or aluminum, they have to endure wind, rain and snow for years. The rail’s dimensions and composition determine its load capacity. Shorter rails = less flex, but longer rails reduce the number of roof penetrations. Most world-wide projects like modular rails with pre-drilled holes for quick, easy work in the field. Angle and placement of the rails matter too—rails set at the right tilt help panels catch more sun and increase production. Ground-mount rails require powerful anchors.
Roof Attachments
Roof mounts vary depending on the roof material—tile, metal, or asphalt shingle. Tile hooks, L-feet, or standing seam clamps all correspond to specific types of roofs. Good sealing is key—installers utilize flashing or rubber gaskets to keep water at bay. Steep roofs might require different brackets than flat ones, and selecting the appropriate attachment means less risk of leaks or issues down the road. Others even play nice with aging roofs, allowing homeowners to tack on solar without big renovations.
Module Clamps
| Type | Features | Pros | Cons |
|---|---|---|---|
| Mid Clamp | Sits between panels | Fast install, strong hold | Needs exact spacing |
| End Clamp | Holds panel edges | Low cost, simple | Fixed size |
| Adjustable | Changes width/angle | Works with many panel types | Slightly pricier |
Adjustable clamps so you can change the tilt in spring or fall, assisting you in achieving maximum solar gain. For outdoor locations, clamps have to be rust resistant and not crack in heavy wind or rain. Quick-lock clamps are a real time saver, but they have to be carefully positioned in order to maintain the panels flat and even.
Grounding Components
Grounding prevents shock hazards and maintains safe systems. Most utilize copper wires or stainless steel clips–both endure well outdoors. Certain markets require special bonding jumpers OR listed lugs for code compliance. Installers have to check local regulations, as the rules vary by country. Good earthing is always essential.
Why Your Solar Mounting Bracket Matters
Solar mounting brackets are about more than just holding panels in place. They protect from brutal weather, secure panels, and extend system longevity. Their excellence defines solar projects’ performance and lifetime cost.
1. System Longevity
Top-notch brackets, crafted from hot-dip galvanized or Zn-Al-Mg coated steel, prevent rust and corrosion for decades. It means solar arrays continue working at peak for their entire life. By employing C channel steel — as Chinese-made systems do — your panels will withstand years of sun, rain and wind without disintegrating.
Material matters. Brackets constructed with Q235 or Q345 steel outlive aluminum or plastic alternatives. They hold panels tight, even after years in the elements. Occasional inspections for rust or rattling, combined with quick repairs, go a long way in extending service life. Crummy brackets, made of thin metals or with weak coatings, can blow out prematurely. In one project, a switch from painted steel to hot-dip galvanized C channel doubled bracket life and halved panel replacements.
2. Weather Resilience
Brackets stare down wind, rain, snow and heat. Galvanized steel fights rust in wet, salty or rainy areas. Reinforced rail designs or extra clamps keep panels in place when the wind blows or snow accumulates. Trusted providers test brackets to global standards like wind tests to 60 m/s and snow loads over 1.4 kN/m2 to guarantee they stand strong. It’s more secure with a bracket designed specifically for your local weather, be it sand or storms.
3. Roof Integrity
Brackets impact the roof they’re attached to. A quality mounting system distributes weight so roofing materials remain solid and dry. Good installers employ the correct screws and sealants, so no leaks develop. How you place the brackets counts—spread-out brackets will relieve tension on vulnerable places. Cause, if brackets are installed incorrectly, roofs can leak or sag — resulting in additional fixes and expenses.
4. Code Compliance
Local building codes specify what’s safe for solar installations. Failing to respect them can mean failed inspections or voided insurance. Structural engineers review plans to align with local ordinances and safety factors. Paperwork–CE marks or SGS certificates, for example,–is required for permits and inspections.
5. Optimal Performance
The right brackets help panels catch more sun by holding them at the best tilt. Concepts that enable you to modify tilt amplify energy, particularly in the event you modify them for every season. Regular bracket checkups usually keep panels working at their best.
Matching Mounts to Roofs
Selecting the optimal solar mounting bracket for a roof requires more than a generic, one-size-fits-all solution. Each B2B buyer has to juggle safety, cost and the technical fit for long-term system reliability. Different roofs demand different mounts, and not all mounts are equal to every task. The points below help guide the match between mounts and roofs:
- Roof pitch and type (metal, tile, membrane, or concrete)
- Environmental loads (wind speed, snow load)
- Compatibility with solar panel size and type
- Need for leak-proofing and roof integrity
- Material and anti-corrosion protection (hot-dip galvanized or Zn-Al-Mg steel)
- Ease of installation and modularity for faster projects
- Local building codes and certification needs
Pitched Roofs
Flush-mounted brackets are frequently the choice for pitched roofs. They allow panels to sit near the roof, reducing wind drag and maintaining a low-profile system. This is the typical arrangement for residences and small businesses, where aesthetics count. Tilted racks can increase yield by orienting panels to the optimal sun angle, but they introduce additional expense and wind exposure.
Mounting on a slope presents its own challenges. Complicated-angle shingles or ancient tiles must be plotted with care. Good installers check the roof first, select hardware that matches the roof material, and utilize high-strength rails and clamps. Landing mounts just right is key. Bad sealing can equal leaks, so pre-assembled mounts with tested gaskets are a savvy choice. Appropriate fasteners and spacing prevent harm to the structure and protect panels in storms or snow.
Flat Roofs
Ballasted mounts are a top solution for flat roofs. They rely on weight rather than bolts, eliminating the need to puncture holes and invite leaks. This is understandable for big structures, warehouses, or anyplace where you’re concerned about sealing the roof. Yet, ballasted racks have to be sufficiently heavy to keep panels down in powerful winds.
Flat roofs require mounts that allow you to adjust the tilt as well. This aids good sun exposure, which can translate in additional wattage. Drainage is key, mounts should not hinder the flow of water or encourage pooling. Lightweight materials, such as aluminum or Zn-Al-Mg steel, reduce load on aging roofs yet withstand outdoors for ages.
Ground Mounts
Ground-mounted systems are ideal for large-scale projects with open land. They’re simple to scale, ideal for solar farms, and allow you to customize the tilt for optimum year-round sun. You can seasonally adjust the tilt, which increases output.
Ground mounts need more site work: clear the land, dig holes, set anchors deep enough for local wind and snow loads. All of these systems require robust, anti-rust steel like Q235 or Q345 with hot-dip galvanizing for longevity. Buyers should verify local regulations—permits and setback restrictions can bog things down, so a vendor with export and compliance expertise is an advantage.

Material Selection Insights
Material selection lies at the core of solar mounting brackets’ long-term value. It defines longevity, installation efficiency, job expense and the system’s resilience against real-time elements. Below is a quick side-by-side comparison of three common materials:
| Material | Benefits | Drawbacks |
|---|---|---|
| Aluminum | Lightweight, corrosion resistant, easy to install | Higher cost, softer (may deform under heavy load) |
| Galvanized Steel | Strong, cost-effective, good for bulk orders | Heavier, risk of rust if coating damaged |
| Stainless Steel | Maximum corrosion resistance, high strength | Most expensive, heavier, harder to machine |
Aluminum
Aluminum is notable for being lightweight, which facilitates transportation and installation, particularly on rooftops with load restrictions. This is a major victory for high-volume jobs or sites with limited crane availability.
It’s natural corrosion resistance makes it well suited to coastal, humid or rainy areas. The oxide layer develops quickly, preventing corrosion. That’s why projects in southeast asia or on islands frequently opt for aluminum.
Installers love aluminum because it’s drillable, or cuttable or shapeable with hand tools. It reduces installation time and labor expense. Modular aluminum rails standard for commercial rooftops
That said, although aluminum holds up well, it’s softer than steel. In high-snow zones, beefier support or hybrid designs might be necessary.
Galvanized Steel
For budget-friendly projects that still have to have some staying power, galvanized steel is the go-to. The hot-dip galvanizing process imparts Q235 or Q345 steel with a robust zinc coating, demonstrated to endure wind, rain & sun for years.
The Zn-Al-Mg option increases this, decelerating rust even if the surface gets scratched. Our factories can mass-produce C channel brackets with these coatings, keeping the cost down on big projects in Africa or Brazil or Europe.
Steel’s strength requires less supports and it easily supports heavy panels or snow loads. It’s weight is a compromise, but for ground mounts it’s not a huge concern.
If the coating is compromised, rust can begin. Periodic inspections or touch-up paint assist in prolonging the bracket’s lifespan.
Stainless Steel
Stainless steel is just the thing in areas where corrosion is the paramount hazard—consider desert, offshore, or industrial sites. It remains gleaming and rust-free even in salt air or acid rain.
It is more expensive initially, but for mission-critical work, it pays dividends. Others do stainless for critical joints or anchor points and opt for less expensive materials otherwise.
For exposed applications—think carports, public areas—stainless steel maintains a tidy appearance. It’s more difficult to saw and drill, therefore schedule more time for installation.
Environmental Factors
Material choice depends on many things: local weather, seismic zone, and wind/snow loads. In strict code nations, such as Europe or Japan, these specs drive the system design.
Recycled aluminum is now standard, reducing the carbon footprint and reducing waste. Others trade plastic components for recycled or bio-based ones.
Beyond the Bracket Itself
Selecting the right solar mounting bracket is about more than just selecting a product. It impacts project expenses, installation velocity, ongoing maintenance, and the residual value of any PV system. For B2B buyers, these decisions drive economic impact and system dependability around the world.
Lifecycle Cost
- Lifecycle cost encompasses more than what you shell out up front. Design, shipping, installation, maintenance and end-of-life removal. For solar mounts, this implies rolling in the cost of steel or aluminum, surface treatment, labor, and even export packaging.
- Bracket quality does change the math. Hot-dip galvanized Q235 or Zn-Al-Mg steel lasts decades, battling rust and abrasion better than painted or thinly coated counterparts. This reduces the necessity of replacements or premature replacements.
- Shelling out more for good, factory-crafted mounting can save money in the long run. Maintenance falls, downtime is uncommon, and structural integrity remains strong. In one case, a South African EPC contractor discovered that converting to Zn-Al-Mg brackets reduced their five-year service bill by 30%.
- Case studies comparing stainless steel, powder-coated, and hot-dip galvanized mounts demonstrate that the latter have the lowest long-term cost per kW installed, particularly in humid or coastal climates.
Installation Efficiency
More basic, rapid installs save money. Pre-assembled brackets, modular rails and standardized clamps equals fewer tools and less time on-site. Bulk-packed, labeled and pre-sorted kits assist crews getting started fast, even in remote areas.
Training plays a role. Nice guides, video demos and digital drawings keep teams from screwing up—like drilling in old brick or bypassing approved panel mounting zones. Others provide hotline support or on-site training, accelerating the learning curve.
Pre-assembled systems minimize mistakes and accelerate work. On a UAE project, crews reduced install time by 25%, with the use of modular C channel racking and pre-fitted clamps.
Future Maintenance
Thinking in advance saves major migraines. Routine inspections for loose bolts, rust, or shifting rails maintain brackets secure and functional. Hot-dip galvanized parts require less maintenance, particularly in challenging locations such as rooftops or open ground arrays.
Various bracket types have various problems. Painted steel can flake, aluminum can bend under heavy snow and non-modular systems take forever to repair if something breaks. Hands-on hardware gets stuff done faster, especially for ground-mounts.
Installing mounts for us, right from the beginning–using approved zones, matching load and following the manual–translates into fewer repairs down the road. Put simply, being invested in your pro’s installs pays off, as evidenced by reduced maintenance calls and extended system life.
Final Thoughts
Lifecycle, install speed, and upkeep shape real project value.
Installation Best Practices
Solar mounting brackets secure panels, safeguard system yield and control project expenses. Check the site and roof before any work begins. Consider the type of panels required, the shape of the roof and the energy consumption. Select the appropriate solar panel and racking system for the application. Most setups use three main parts: roof attachments, mounting rails, and module clamps. These components cooperate interdependently to support the panels so they can capture maximum sunlight.
For optimal performance, never steer away from the bracket maker’s instructions. This helps maintain the warranty and ensures the brackets perform as tested. Best brackets use hot-dip galvanized C channel steel or Zn-Al-Mg steel. These coatings prove durable in rugged climate, even with heavy rains or salty air. Our products are usually pre-assembled. This reduces time on site and minimizes errors. Be sure to apply the proper torque on bolts, and verify that clamps and rails are secure. Avoid shortcuts—little mistakes can cause system loss or panel shifts in strong wind.
Safety first. Always keep your right shoes, gloves and helmet on. Use harnesses and ropes if you work on roofs or at height. Keep work spaces clear to reduce trips or drops. Inspect all tools prior to startup. Carefully lift panels, never stand or lean on them. For ground-mounted systems, ensure soil is packed and level prior to setting anchors. Mark out cable runs to prevent tripping or pinched wires when installed.
After installation, re-check all bolts and clamps. Panels must sit snug with no wobble. For optimal power, orient panels south and adjust tilt to the local sun angle. Inspect the system bi-annually. Check the brackets for rust or looseness. Wipe away grime and leaves that can block the sun. A lot of customers choose our C channel steel because it’s sturdy, easily shippable, and a breeze to install. In many countries, mounts and racking are roughly 10% of the project cost, so smart choices go a long way.
Conclusion
Quality solar mounts render each panel secure and robust. The right bracket withstands wind, rain and sun. Opt for steel or alloy that battles corrosion. Drive in strong bolts and test the fit. Even tiny bits count. A solid install is time-saving and leak-stopping. Teams in Brazil, South Africa, and the Middle East want easy jobs and simple directions. True work demonstrates our steel rails and clamps endure in rugged locations. Buy in bulk or request a custom fix to fit your site. Our team is standing by to assist with specs, plans, and shipping. Want to verify sizes or view drawings? Request free design/full tech sheet. Grab the perfect bracket for your next project.
Frequently Asked Questions
What is a solar mounting bracket?
A solar mounting bracket is what fastens solar panels to roofs or other surfaces. It keeps everything stable and the panels at the perfect angle toward the sun.
Why is the right mounting bracket important for solar systems?
Your choice of bracket affects not only your safety, but your system durability and energy production. It safeguards your roof and panels from weather or installation-related damage.
How do I match a mounting bracket to my roof type?
Choose a bracket for your type of roof and its pitch. Manufacturers cover the most common roof types: flat, tiled and metal. Just check before purchase to see if they’re compatible.
Which materials are best for solar mounting brackets?
Aluminum and stainless steel are common. They’re corrosion-resistant and weather-resistant. Select outdoor- and solar-rated materials for extended system longevity.
What else should I consider beyond the bracket itself?
Think whole mounting system including rails, fasteners, and grounding. Great design and good parts make for a safer and better system.
Can I install solar mounting brackets myself?
We suggest professional installation for safety and warranty protection. Professionals take care of proper positioning, tightness of fit, and local building codes.
Are solar mounting brackets weather-resistant?
The majority of solar mounting brackets are built to withstand wind, rain and sun. Be sure to check out the product’s certifications and suitability for your local climate before installing.
