 跳到内容
跳到内容 Installing solar panels effectively requires a solid understanding of mounting brackets, which are essential for securing the panels safely and efficiently to various surfaces such as roofs, RVs, boats, and ground mounts. This comprehensive guide will walk you through the process of installing solar panel mounting brackets, covering types of brackets, preparation, installation steps, safety tips, and maintenance. The article emphasizes the core keyword solar panels and references the expertise and product range of cchannelsteel.com, a trusted supplier of solar mounting hardware.

Understanding Solar Panel Mounting Brackets
Solar panel mounting brackets are hardware components that connect solar panels to their installation surfaces. They ensure the panels are firmly fixed, correctly oriented, and able to withstand environmental stresses such as wind, rain, and snow. The right mounting bracket system improves solar panel efficiency by maintaining optimal tilt and ventilation.
Common Types of Solar Panel Mounting Brackets
- Z Brackets: Lightweight, simple metal brackets shaped like the letter “Z,” ideal for small to medium panels and curved surfaces like RV roofs.
- L Brackets: Right-angle brackets used for mounting panels flat or at fixed angles on roofs, poles, or frames.
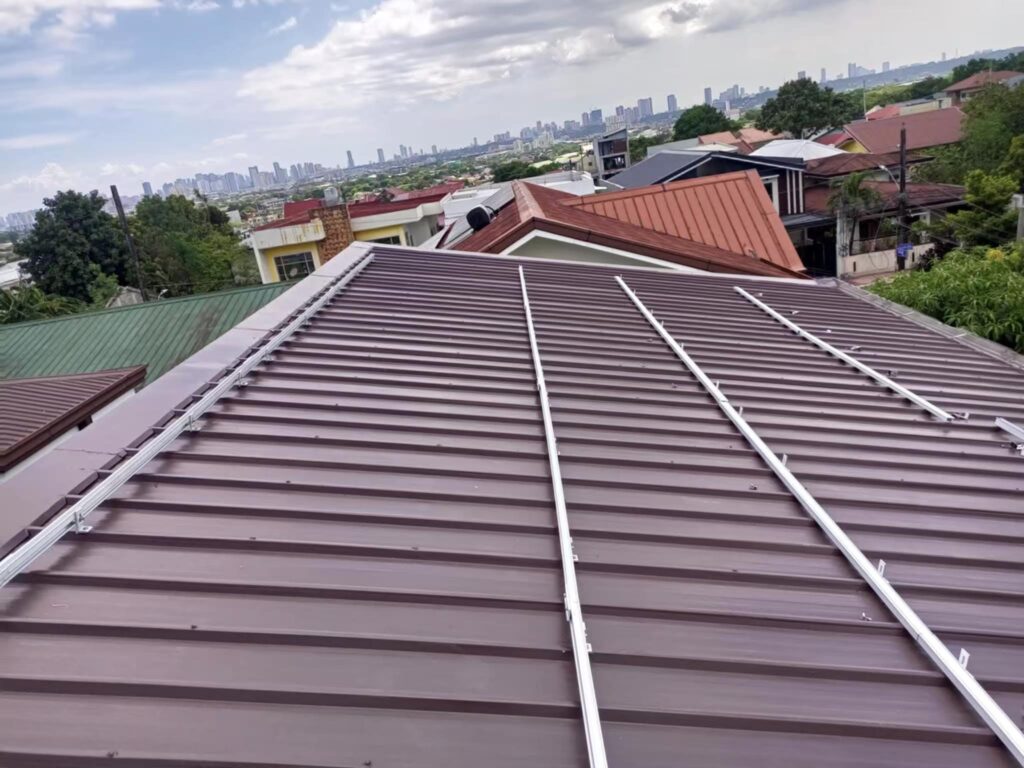
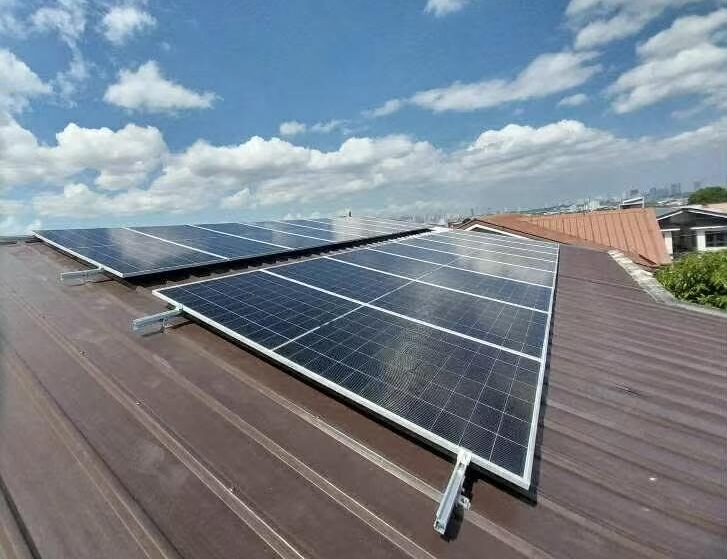
- Rail Mount Systems: Aluminum rails attached to roofs or ground frames, supporting multiple panels with high stability.
- Adjustable Tilt Brackets: Allow changing the panel angle to optimize solar exposure seasonally.
- Corner and Side Brackets: Plastic or metal brackets that attach to panel edges, often used for drill-free installations on RVs or boats.
Tools and Materials Needed for Installation
- Solar panel mounting brackets (type depends on application)
- Stainless steel bolts, nuts, washers, and lock washers
- Drill with appropriate drill bits
- Screwdrivers, wrenches, or socket sets
- Measuring tape and level
- Sealant or flashing materials (for waterproofing roof penetrations)
- Safety gear: gloves, eye protection
- Cleaning supplies (alcohol wipes or similar)
Step-by-Step Installation Process
Surface Preparation
Before installing mounting brackets, clean and inspect the mounting surface to ensure it is free of dirt, debris, and damage. For roofs, verify the structural integrity and identify any obstacles such as vents or antennas.
Marking and Measuring
Measure and mark the exact locations where brackets will be installed, ensuring even spacing and alignment. Use a level to maintain consistent panel positioning.
How Z Brackets Support Air Circulation
Z brackets feature a raised, offset design that naturally creates a gap between the solar panel and the mounting surface. This clever little lift-off ensures there’s enough space underneath each panel for air to circulate freely. Adequate airflow not only keeps the panels cooler—essential for maintaining efficiency on hot days—but also helps reduce moisture buildup, prolonging the lifespan of both the panels and the mounting surface. Thanks to this ventilating effect, Z brackets are a popular choice for installations where regulating panel temperature matters, especially on small-scale setups like RVs or curved surfaces.
What Comes in a Typical Mounting Hardware Package for Rigid Solar Panels
When you purchase a mounting hardware kit for rigid solar panels, you’ll typically find everything needed for secure and durable installation. Most packages include:
- A set of custom-fit Z brackets, which provide stable mounting points for attaching panels to flat or gently curved surfaces like rooftops.
- Stainless steel bolts, washers, and lock nuts to ensure a firm, rust-resistant connection that holds up in various weather conditions.
- Pre-drilled holes in the brackets for easier alignment and straightforward installation, reducing the guesswork during setup.
- Rubber pads or gaskets (in some kits) to help cushion the panel against vibration and minimize the risk of leaks when used on RV and boat roofs.
This all-in-one approach saves time and ensures compatibility between components, making the installation smoother whether you’re working on a rooftop, an RV, or a ground frame.
Compatible Solar Charging Systems and Kits
The solar panel mounting brackets outlined above are designed with versatility in mind, making them suitable for a wide range of solar charging systems and kits. Whether you’re outfitting your home, RV, boat, or an off-grid cabin, these brackets are compatible with many leading solar kits and modules on the market.
Here are some common types of solar charging kits and modules that pair well with these mounting systems:
- 100–200 Watt Solar Kits: Ideal for smaller installations such as RVs, tiny homes, boats, or remote monitoring systems. These include kits from popular third-party brands like Renogy, HQST, ALLPOWERS, and Eco-Worthy.
- 300–400 Watt Expansion Kits: Perfect for larger mobile setups or residential add-ons—these connect to your existing panels or work as standalone systems, compatible with most rail and Z bracket configurations.
- Premium 500–600+ Watt Solar Systems: Designed for more significant energy needs, such as full-time RV living or comprehensive home setups. Adjustable tilt and rail mounts can provide the needed strength and flexibility for brands like Rich Solar, BougeRV, and Newpowa.
- Modular Solar Modules (up to 200 Watts per panel): Both framed and frameless modules from leading manufacturers slot into universal L brackets or rail systems, offering installation flexibility.
- Expansion Panels: If you’re looking to add capacity to an existing system, side and corner brackets can often be used for drill-free or rapid mounts on newer panels from most major makers.
Whichever charging system you select, these brackets support widely used module sizes and mounting styles, ensuring secure installation and reliable performance across the board. Always check specific compatibility with your panel model, but rest assured that our recommended brackets are engineered for cross-brand adaptability.
What’s Included with Large Solar Kits?
Most large solar kits, as well as complete solar and inverter systems, generally come equipped with two or more mounting hardware sets. Each set typically contains four Z brackets along with the necessary screws for installation, ensuring you have enough hardware to securely fasten multiple panels to your chosen surface. This approach is designed to simplify installation and provide reliable support for your solar panel array.
Drilling Holes
Drill pilot holes at marked locations, using the correct drill bit size for your mounting hardware. For roof installations, take care to avoid damage to underlying structures and prepare to seal all penetrations.
Attaching Mounting Brackets
Secure the mounting brackets using stainless steel bolts and washers. Tighten bolts to manufacturer specifications to avoid damage or loosening. For Z or L brackets, attach them directly to the solar panel frame and then to the mounting surface.
Mounting the Solar Panels
With brackets installed, carefully position the solar panels onto the brackets. Secure the panels using the provided hardware, ensuring firm attachment without over-tightening.
Sealing and Waterproofing
Apply sealant around all roof penetrations and mounting points to prevent leaks. Use flashing kits where applicable to maintain roof integrity.

Wiring and Final Checks
Route solar panel wiring safely, securing cables to avoid abrasion or damage. Inspect all hardware for tightness and stability. Verify panel orientation and tilt angle for maximum efficiency.
Comparison Table: Common Solar Panel Mounting Brackets
| Bracket Type | Material | Tilt Adjustable | Load Capacity | Suitable Surfaces | Pros | Cons | Typical Cost Range |
|---|---|---|---|---|---|---|---|
| Z Brackets | Aluminum | No | Medium | RV roofs, boats, flat roofs | Lightweight, easy install | Fixed angle, limited to smaller panels | $10–$40 per set |
| L Brackets | Aluminum/Stainless | No | Medium | Roofs, poles, RVs | Strong, simple design | Requires drilling, fixed angle | $10–$40 per bracket |
| Rail Mount Systems | Aluminum | Optional | High | Residential/commercial roofs | Scalable, supports multiple panels | Complex installation, higher cost | $80–$250+ per kit |
| Adjustable Tilt Brackets | Aluminum/Steel | Yes | High | Roofs, ground mounts | Maximizes energy yield | More expensive, complex install | $40–$120 per set |
| Corner/Side Brackets | Plastic/Aluminum | No | Medium | RVs, boats, sheds | Drill-free, clean look | Lower strength, less durable | $20–$60 per set |
Best Practices and Tips for Installing Solar Panel Mounting Brackets
- Always use corrosion-resistant hardware such as stainless steel to ensure longevity.
- Avoid overtightening bolts to prevent damage to panel frames.
- Maintain adequate clearance between the panel and mounting surface for airflow.
- Use high-quality sealants and flashing to protect roof penetrations.
- Follow manufacturer guidelines for torque specifications and installation procedures.
- Periodically inspect mounting hardware and reseal as necessary to maintain system integrity.
- Consider local building codes and regulations when installing solar panels.
Why Choose CChannelSteel.com for Your Solar Panel Mounting Needs?
CChannelSteel.com offers a comprehensive range of solar panel mounting brackets and hardware designed for durability, corrosion resistance, and ease of installation. Our products cater to residential, commercial, and mobile solar applications, including RVs and boats.
Advantages of partnering with CChannelSteel.com include:
- High-quality aluminum and stainless steel mounting brackets
- Custom fabrication services tailored to your project
- Competitive pricing and bulk order discounts
- Expert technical support and installation guidance
- Fast shipping and reliable customer service
Visit cchannelsteel.com to explore our full product range and find the perfect mounting solution for your solar panel installation.
Conclusion
Proper installation of solar panel mounting brackets is critical to the performance, safety, and longevity of your solar energy system. Whether you choose Z brackets for a simple RV setup, rail mounts for a residential roof, or adjustable brackets for seasonal optimization, following best practices ensures your solar panels remain secure and efficient.
For trusted, durable, and expertly engineered mounting hardware, rely on cchannelsteel.com to support your solar panel projects with quality products and professional service.
