 跳到内容
跳到内容 If you’ve decided to embrace solar energy and reduce your reliance on the grid, congratulations! Installing your solar panels yourself can be a rewarding project that saves you money and gives you a deeper understanding of your solar power system. This comprehensive DIY guide will walk you through how to mount solar panels using solar brackets, focusing on rigid rooftop solar panels, with detailed steps, materials, and tips to ensure a safe and efficient installation.
This guide references the EcoFlow 400W rigid solar panel and its tilt mount bracket as an example, and integrates professional insights suitable for DIY installers. Additionally, we highlight the advantages of using high-quality mounting materials such as C-channel steel, available from C-Channel Steel, to ensure durability and stability in your solar bracket system.


- Introduction to Solar Panel Mounting
- Required Components for Solar Panel Mounting
- Choosing the Right Materials for Solar Brackets
- Best Locations to Mount Solar Panels
- Tools and Safety Preparations
- Step-by-Step Solar Panel Mounting Guide
- Connecting Multiple Panels
- Maintenance and Troubleshooting
- Cost and Material Comparison Table
- Why Choose C-Channel Steel for Your Solar Brackets
- Final Thoughts
Introduction to Solar Panel Mounting
Solar panel mounting is a critical step in setting up your solar power system. The mounting system, often referred to as solar brackets, secures your solar panels to your roof or ground, ensuring they remain stable and optimally angled to capture sunlight efficiently. Proper mounting protects your investment by preventing damage from wind, weather, and other environmental factors.
Required Components for Solar Panel Mounting
The components needed vary depending on your solar panel model and mounting type. Using the EcoFlow 400W rigid solar panel as an example, the basic components include:
- Fixing Brackets: Four brackets to attach to the panel frame.
- Adjustable Brackets: Two brackets to set the tilt angle.
- Screws and Bolts: For securing brackets and mounts.
- Roof Attachments: Fasteners drilled into the roof for secure anchoring.
- Mounting Rails: Structural rails that support the panels (optional depending on system).
- Module Clamps: Connectors that hold panels to rails or brackets.
Additional tools include:
- Wrench
- Angle ruler or triangle ruler
- Tarp or canvas (to protect panels during installation)
Choosing the Right Materials for Solar Brackets
Choosing the right material for your solar brackets affects durability, ease of installation, and longevity. Common materials include:
| Material | Pros | Cons |
|---|---|---|
| Aluminum | Lightweight, corrosion-resistant, easy to drill | Not suitable for welding |
| Angle Iron | Easy to weld, readily available | Prone to rust unless galvanized |
| Stainless Steel | Extremely durable and corrosion-resistant | Heavy, expensive, difficult to work with |
| Wood | Inexpensive, easy to work with | Degrades faster, requires treatment |
| C-Channel Steel | Strong, versatile, cost-effective, easy to fabricate | Requires protective coating to prevent rust |
Among these, C-channel steel offers an excellent balance of strength, cost, and ease of fabrication, making it ideal for solar brackets, especially for rooftop and ground mounts.
Best Locations to Mount Solar Panels
Choosing the right location is key to maximizing your solar energy production:
- Residential Roof: Most common; panels should face south (in Northern Hemisphere) and be free from shading.
- RV/Van Roof: Use flexible or rigid panels; consider curved surfaces.
- Pole Mount: Allows angle adjustment; suitable for limited space or single-panel setups.
- Ground Mount: Ideal if roof space is limited or shaded; requires more land area.
- Wall Mount: Good for small panels; must receive direct sunlight.
Tools and Safety Preparations
Before starting, gather all tools and ensure safety:
- Safety harness and helmet (for roof work)
- Ladder and scaffolding
- Drill and bits (appropriate for roof material)
- Measuring tape and angle finder
- Sealant and flashing for waterproofing roof penetrations
- Obtain necessary permits and check local building codes
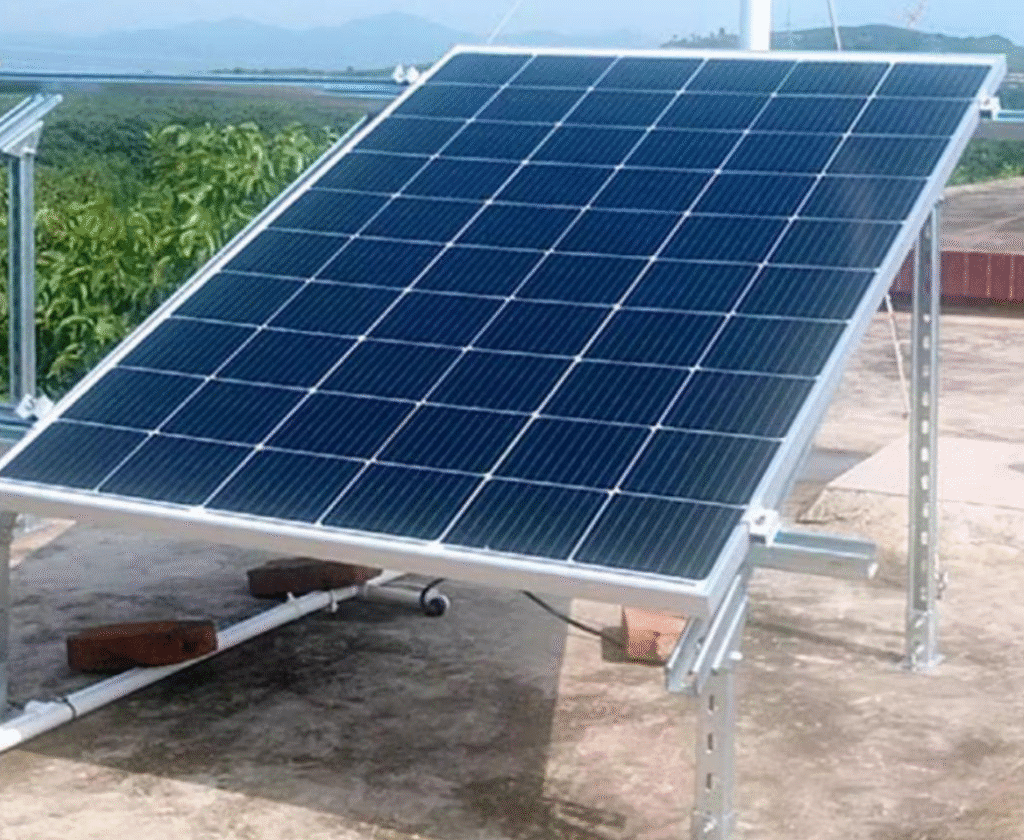
Step-by-Step Solar Panel Mounting Guide
Using the EcoFlow Tilt Mount Bracket as an example, here’s how to mount your solar panels:
Plan and Prepare
- Review your roof or mounting site for structural integrity.
- Obtain permits and check local regulations.
- Clear the area and protect your panels by laying them on a tarp.
Attach Fixing Brackets to Solar Panel
- Place the panel face down on a tarp.
- Align fixing brackets with the mounting holes on the panel frame.
- Secure brackets using screws without overtightening.
Connect Fixing Brackets to Mounting Holes
- Attach the fixing brackets firmly to the panel’s mounting holes on both sides.
- Ensure symmetrical alignment and level mounting holes.
Attach Other Legs of Fixing Brackets
- Connect the other leg of each fixing bracket to form the base.
- Tighten screws by hand to allow tilt angle adjustment.
Attach Adjustable Brackets
- Connect adjustable brackets to fixing brackets on both sides.
- Set the tilt angle to at least 10 degrees to minimize dust accumulation and optimize sunlight capture.
- Adjust angle based on your latitude and seasonal sun position.
Secure the Mounting System to Roof or Ground
- For rooftop: Drill roof attachments and use flashing to prevent leaks.
- For ground mount: Secure the brackets to concrete footings or ground screws.
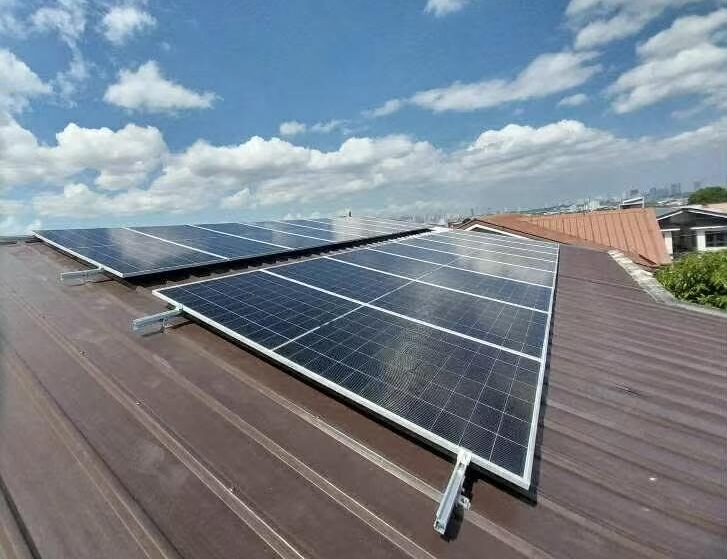
Connect Multiple Panels (Optional)
- Maintain at least 20mm (¾ inch) gap between panels for airflow.
- Panels can be connected in series or parallel depending on system design.
Connecting Multiple Panels
When installing multiple panels, consider:
- Electrical configuration (series vs. parallel) affects voltage and current.
- Maintain proper spacing for ventilation and maintenance access.
- Use appropriate wiring and connectors rated for outdoor use.
Maintenance and Troubleshooting
- Regularly inspect mounts for loose bolts or corrosion.
- Clean panels periodically to maintain efficiency.
- Check for any roof damage or water leaks near mounting points.
- Adjust tilt angle seasonally if possible for optimal energy production.
Cost and Material Comparison Table
| Material | Durability | Cost | Ease of Installation | Corrosion Resistance | Best Use Case |
|---|---|---|---|---|---|
| Aluminum | Medium | Medium | Easy | High | Residential roof mounts |
| Angle Iron | Medium | Low | Medium | Low (unless galvanized) | Budget installations |
| Stainless Steel | Very High | High | Difficult | Very High | Harsh environments |
| Wood | Low | Low | Easy | Low | Temporary or DIY frames |
| C-Channel Steel | High | Medium | Medium | Medium (with coating) | Durable rooftop & ground mounts |
Why Choose C-Channel Steel for Your Solar Brackets
At C-Channel Steel, we provide premium, durable, and cost-effective C-channel steel solar brackets tailored for modern solar installations. Benefits include:
- Robust structural strength for long-term stability
- Compatibility with various roof types and ground mounts
- Easy customization and fabrication for specific project needs
- Protective coatings to resist corrosion and weathering
- Competitive pricing without sacrificing quality
Using C-channel steel brackets ensures your solar panels are securely mounted, maximizing performance and lifespan.
Key Considerations Before Mounting Solar Panels on Your Roof
Before you start securing panels to your roof, there are a few essential factors to weigh to ensure your installation is both effective and long-lasting.
1. Roof Age and Condition
Inspect your roof’s age and structural integrity. Most residential roofs last between 25 to 50 years, depending on materials like asphalt shingles, metal, or tile. If your roof is nearing the end of its service life or shows signs of damage, it’s generally best to replace or repair it before adding solar panels. This minimizes the need for future panel removal and reinstallation—saving you time and money in the long run.
2. Roof Orientation and Tilt
The amount of sunlight your panels receive—and therefore your solar energy output—heavily depends on roof direction and angle. In the northern hemisphere, south-facing roofs usually capture the most sunlight, but east/west-facing roofs can still work with a minor reduction in efficiency. Assess the tilt of your roof, as steeper inclines may offer optimal sunlight, but extreme slopes can complicate mounting.
3. Shade and Obstructions
Evaluate nearby trees, chimneys, or even neighboring buildings that could cast shadows on your panels and compromise their performance. Whenever possible, trim foliage or select areas of your roof that remain unshaded throughout the day to maximize energy harvest.
4. Roof Material Compatibility
Solar brackets and mounts work well on most common roofing materials (asphalt, metal, tile), but installation techniques may vary. For example, tile roofs might require specialized mounts or additional waterproofing steps. Check if your mounting hardware is suited for your particular roof type, and consider consulting with manufacturers like C-Channel Steel for compatible components.
5. Structural Load Capacity
Solar panels and their mounting systems add weight to your roof. Most residential roofs can handle the added load, but it’s smart to consult with a structural engineer if your roof is older or features unique construction. Reinforcement may be required for long-term safety.
6. Permits and Local Regulations
Before drilling any holes, research local building codes, HOA restrictions, and required permits for solar installations in your area. Regulations vary, so checking in advance can help you avoid costly surprises or installation delays.
By thoroughly assessing these aspects, you’ll lay the groundwork for a smooth installation—one that protects both your investment and the longevity of your home’s roof.
Factors Influencing Your Mounting Method and Location
Selecting the best method and site for mounting your solar panels depends on several key considerations. Your choice should balance budget, available space, roof or ground conditions, and how much sunlight your chosen area receives throughout the day.
- Roof and Surface Type: Flat, sturdy surfaces—such as the south-facing portion of your roof in the Northern Hemisphere—are generally ideal for maximum sun exposure. However, if your roof is irregular or shaded, ground mounts or wall mounts might provide better results.
- Budget Constraints: Some mounting systems and materials, like C-channel steel, offer a cost-effective blend of strength and durability. If you’re working with a strict budget, weigh the upfront costs against long-term reliability and maintenance needs.
- Sunlight and Orientation: Maximize efficiency by aiming panels where they’ll catch the most sun. Consider your home’s geographic location, typical weather, and any obstructions (like neighboring trees or buildings) that could cast shade.
- Panel Compatibility: While rigid panels are preferred for main residential systems, flexible panels can be added to fit awkward spaces or supplement your system—but keep in mind that they generally provide less power.
- Tilt Angle: To boost energy yield, adjust your panels’ tilt to match your latitude or change with the seasons. Roof pitch, mounting method, and time of year all influence the best angle. Research local recommendations or use online tilt calculators for your specific location.
- Structural Integrity: Before installation, ensure that your mounting surface and brackets can support the weight and withstand wind loads. Consult product manuals and, if needed, seek professional guidance to safeguard your investment.
By weighing these factors, you’ll set your panels up for long-term performance and durability—while making the most of your chosen location.
Comparing Mounting Options: RVs, Vans, Poles, Ground, and Walls
Not every solar panel ends up on a traditional rooftop—some hit the road, some hug the ground, and others even climb the walls. Each mounting scenario brings its own quirks, advantages, and considerations.
RVs and Vans:
Solar installations on moving vehicles like RVs and vans prioritize flexibility and lightweight design. Flexible or semi-flexible panels are popular choices here, as they contour easily to curved or uneven surfaces—think of them as the yoga masters of the solar world. Weight is a key concern, so lightweight materials such as aluminum mounting brackets and adhesive-backed panels are often preferred. Power needs are generally lower than in stationary homes, meaning smaller systems suffice. Plus, you can reorient or reposition panels with relative ease to chase that perfect patch of sunshine at your next campsite.
Pole Mounts:
Mounting a solar panel on a pole is a practical solution where ground or roof space is tight—or when you only need a panel or two. Pole mounts allow for simple manual angle adjustments, helping you maximize exposure as the sun makes its journey across the sky. However, the downside is capacity: pole setups typically support a single panel or a small array, so they suit lower energy demands, such as for garden lighting or small off-grid cabins.
Ground Mounts:
Ground-mounted arrays are perfect when roof real estate just isn’t enough—or it’s too shady. These installations typically use sturdy brackets and rails made from materials like C-channel steel for durability. Ground mounts offer ease of maintenance, straightforward cleaning, and the flexibility to orient panels precisely. Portable options also exist, letting you move panels throughout the day or take them on the go. The catch? You’ll need sufficient open land and, for permanent setups, may need to pour concrete for the footings.
Wall Mounts:
Got a sunny south-facing wall? Wall-mounting panels can supplement an existing rooftop system or serve as a space-saving solution for smaller installations—think 100W panels for a shed or workshop. The key difference is orientation: walls typically receive less consistent solar exposure throughout the day compared to roofs or ground mounts. Still, it’s a great way to grab some extra watts without extra square footage.
In summary, alternative mounting approaches let you tailor your solar solution to your space, mobility needs, and energy goals. Just remember to choose bracket materials and mounting hardware suited for each unique location to ensure both safety and performance.
Common Mistakes to Avoid When Mounting Solar Panels
While DIY solar panel installation can be rewarding, there are a few pitfalls you’ll want to steer clear of to ensure your setup is efficient and long-lasting:
- Modifying the Panel Frame
Tempting as it may be, never drill new holes or alter the solar panel frame. Doing so usually voids the manufacturer’s warranty (Panasonic, LG, and SunPower are especially strict about this). Always use the mounting holes provided. - Ignoring Tilt Angle
Mounting your panels flat might seem easier, but if the tilt angle is less than 10 degrees, dust and debris will build up quickly, reducing performance. Set the tilt to at least 10 degrees—or plan on cleaning more often than you’d like. - Skipping the Manual
Each panel and mounting bracket can be a little different. Don’t skip reading the installation manual or manufacturer’s instructions. Overlooking recommended installation methods could lead to costly mistakes—or leave you without warranty protection. - Over-Tightening or Under-Tightening
Stripping screws or leaving bolts loose can both spell trouble. Use the recommended torque, and check all fasteners before declaring the job done. - Skimping on Safety
It bears repeating: if you’re not 100% comfortable working on roofs or with power tools, hire a pro. The increased demand for solar means there are plenty of certified installers competing on price, so shop around. - Focusing Solely on Cost
Saving a few dollars on installation won’t pay off if your system underperforms due to shortcuts. Prioritize safety, performance, and long-term reliability over bare-minimum costs.
By keeping these common mistakes in mind, you’ll greatly increase the odds of a successful—and warranty-protected—solar installation.
Weighing the Pros and Cons of Rooftop Solar Panel Installation
When deciding where to mount your solar panels, a residential roof is usually the default choice—and for good reason. Rooftop installations typically offer direct exposure to sunlight with minimal shade throughout the day. This helps you get the most efficient energy yield, especially if your roof faces south (or north in the Southern Hemisphere) and isn’t blocked by trees, chimneys, or neighboring buildings.
Benefits of Rooftop Solar
- Space-saving solution: Utilizing unused roof real estate means you don’t sacrifice valuable yard or garden space.
- Optimal sun exposure: Well-positioned rooftops allow panels to capture maximum sunlight, boosting system performance.
- Potential roof protection: Properly installed panels can act as a barrier, shielding your roofing materials from harsh UV rays, rain, hail, and debris, which may even extend the roof’s lifespan.
- Broad compatibility: From single-family homes and cabins to tiny houses and backyard sheds, most structures with a stable roof can host panels.
Drawbacks to Consider
- Roof orientation and pitch limitations: If your roof doesn’t face the optimal direction or is too steep/flat, solar efficiency may drop.
- Structural assessment required: Not all roofs can handle the additional weight, especially older structures or those made from lighter materials.
- Age of roof: Installing solar panels on a roof nearing the end of its life isn’t ideal; you’ll need a new roof first to avoid future removal and reinstallation costs.
- Installation complexity: Working on rooftops adds safety risks and can complicate accessibility for both installation and future maintenance.
By carefully considering your roof’s condition and orientation, a rooftop solar array can be a durable, efficient, and practical choice for most homeowners.
DIY Installation vs. Professional Solar Panel Mounting: Weighing the Risks
Taking the DIY route for mounting solar panels is an appealing way to save on upfront costs and gain hands-on experience with your renewable energy investment. However, it’s important to consider the potential risks that come with self-installation compared to hiring a certified professional.
Potential Risks of DIY Solar Panel Installation
- Safety Concerns: Working at heights and handling electrical components carries inherent hazards. Without proper safety training or equipment, DIY installers may expose themselves to risks such as falls, electric shock, or improper handling of heavy panels.
- Warranty Issues: Many panel and inverter manufacturers, such as those from well-known brands like LG, Panasonic, or Q CELLS, require installation by qualified professionals to maintain warranty coverage. Ignoring these guidelines could void your product warranty, leading to unexpected costs if repairs or replacements are needed down the line.
- Code Compliance and Permits: Professional installers are familiar with local building codes, permits, and inspection requirements. DIY projects that overlook code compliance might face legal or regulatory setbacks, delays, or additional expenses for modifications.
- System Efficiency: Precise placement, secure mounting, and proper wiring are essential for optimal energy output. Mistakes in tilt angle, alignment, or electrical connections—often due to lack of experience—can reduce system performance or even cause long-term damage to your panels and roof.
- Protecting Your Investment: Skimping on installation quality to save money can lead to more expensive repairs later. Choosing a reputable installer not only safeguards your panels, but also ensures that your system operates at peak efficiency from day one.
Before starting a DIY solar project, carefully weigh these risks against the benefits. If you’re uncertain about any steps or lack the necessary experience, seeking guidance from professional installers may be the best way to protect both your safety and your investment.
Final Thoughts
Mounting solar panels yourself is achievable with proper planning, tools, and materials. Using high-quality solar brackets like those made from C-channel steel will ensure your system is safe, efficient, and durable. Always follow manufacturer instructions and local regulations to protect your investment and warranty.
If you prefer professional support, many installers are available to assist with complex installations. However, for DIY enthusiasts, this guide offers a clear roadmap to successfully mount your solar panels and start enjoying clean, renewable energy.
If you want to explore high-quality C-channel steel solar brackets or need custom solutions, visit C-Channel Steel to learn more.
This article is based on the latest solar mounting practices and the EcoFlow DIY guide for mounting rigid solar panels.
